TERMEXO / USER GUIDE
User guide
Start with your first workspace. Keep your terminals, Agents and project progress together.
The English PDF matches this page and works offline. Labels and button locations may vary by app language or version. The workbench screenshot shows the Chinese interface.
01 / Install and get started
Termexo is a Windows workbench for real terminals and coding Agents. No Termexo account is required. To use an Agent, you still need its CLI and a signed-in account or a model provider's API key.
Choose an installation method
- Download the installer: open the latest GitHub release, download the Windows x64 installer from Assets, and run it. The desktop app requires WebView2. Installer users do not need Rust or the source development toolchain.
- Run through npm: with Node.js 18.18 or later installed, run the following command in Windows PowerShell. The npm package includes the desktop executable; WebView2 is still required.
npx termexo@latestFor a global command, run npm install --global termexo, then launch termexo. Run the installation command again to update a global installation.
Your first session in three steps
- Create a workspace. Use the first-run guide to create a workspace. Enter a project name and select a project folder that actually exists on this computer.
- Prepare an Agent. Check the detection status of Claude Code, Codex, OpenCode, Pi Agent, Antigravity and Grok Build in Settings. If needed, open Install & update, choose the Agent and click Install latest version. Complete the selected Agent's sign-in or model configuration. Starting a terminal for an agent that is not installed also offers Install from the dialog itself, opened on that agent.
- Open a terminal. Click New on the tab bar, select an Agent, and confirm the working folder, account and model. Start it and enter a task. You can also open a regular terminal first to check the project path and command environment.
Start with a small check, such as: "Read this project and explain how to run its tests. Do not change any files yet." Confirm the folder, account and connection before assigning code changes.
Installing an Agent's CLI
Use Settings → Install & update. Install a missing Agent with one click or check an existing version. Close settings and return to see the result. Versions, commands and logs are in Advanced options & details.
- The official npm package: a version can be named and a failed install is rolled back to the previous one. Needs Node.js and npm, and uses the proxy and registry settings in effect.
- Official Windows installers: Claude Code, Codex and Antigravity offer vendor installers without version pinning or rollback. For installed Antigravity, Check & update runs its official updater. OpenCode, Pi Agent and Grok Build use npm.
02 / Workspaces and terminals
A workspace groups a project folder, terminal tabs and a layout. Create separate workspaces for different projects, then rename or color-code them. Drag workspace rows to reorder projects; the row menu appears on hover or keyboard focus. Switching projects does not require rearranging every terminal.
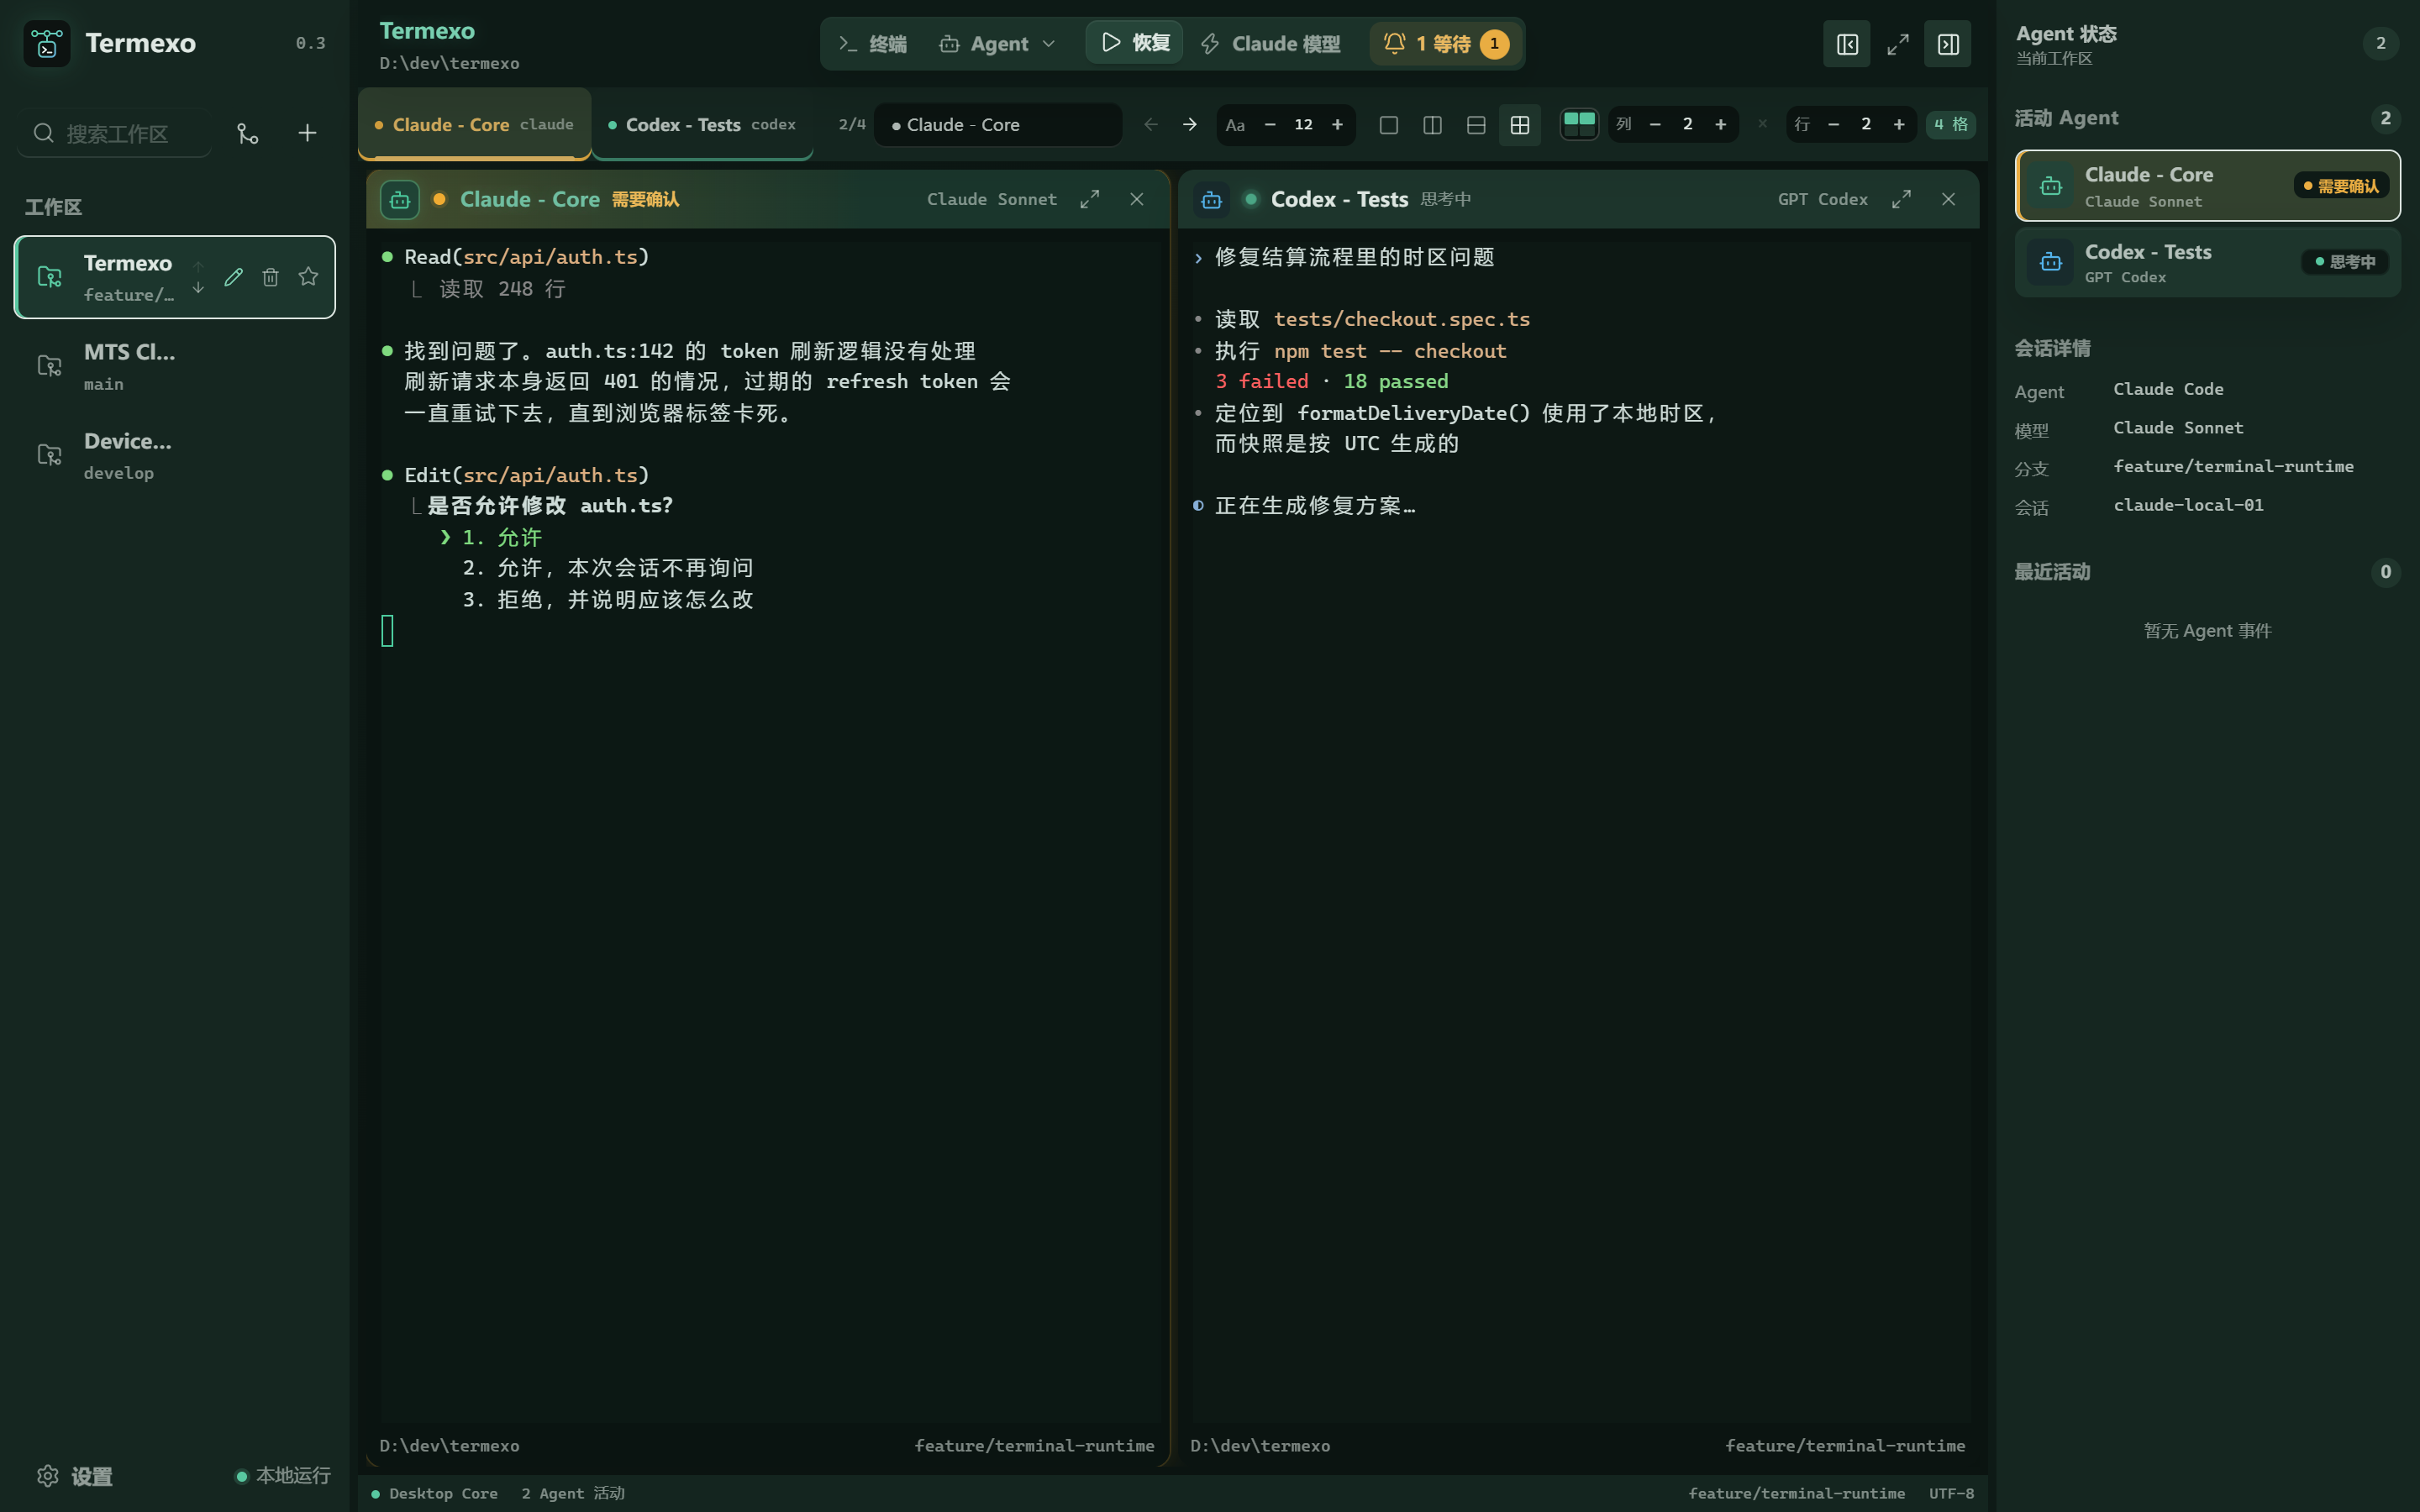
Arrange your workbench
- Use New on the tab bar to start a regular shell, Claude Code, Codex, OpenCode, Pi Agent, Antigravity or Grok Build. The working folder is a local directory, not a GitHub web address.
- Open several tabs, select the terminals to display, and adjust the grid. Choose 1 to 6 rows/columns or maximize a terminal. Drag tabs to reorder them.
- Each terminal runs a separate real process. Agents editing the same folder can affect each other's work. Use separate directories or Git worktrees when changes need isolation.
Understand status alerts
- Running / thinking: the Agent is processing a task or using tools.
- Waiting for input / approval: read the request in that terminal. Input, approval and completion notices keep the taskbar flashing until acknowledged or cleared, even after activating the window.
- Completed / failed / stopped: inspect terminal output and file changes before accepting, troubleshooting or restarting. A status badge does not prove the code passed validation.
Automatic confirmation reduces approval prompts and expands what an Agent may execute without asking each time. Keep manual confirmation for unfamiliar or sensitive projects. An AUTO badge is not a security review.
Workspace Agent icons follow terminal order and use state colors; hover to see the latest window name. When an Agent finishes, Confirm completion clears its notice; it does not replace task verification. Git confirms the selected terminal's branch; an unconfirmed branch or a non-Git folder stays blank.
03 / Resume sessions
- Open the Session Center and search for local Claude Code, Codex, OpenCode, Pi Agent, Antigravity or Grok Build sessions. Narrow the list by project, account or other available filters.
- Check the folder, Agent, account and recent activity to identify the session you want.
- Select Resume and confirm the launch options. Termexo uses the CLI's native resume capability, then lets you continue in a terminal.
Termexo discovers native session records read-only; it does not rewrite history to simulate recovery. Resuming context depends on the original session files, account, CLI version and project path still being available.
Restoring a workspace layout does not bring an exited process back to life. After closing the app or restarting Windows, unsaved work in a regular shell cannot be recovered from the layout. Use native session recovery for an Agent's saved context.
04 / Accounts, models and network
Sign-in accounts
Manage isolated sign-in accounts in Settings and follow the corresponding CLI's authorization flow. Select an account when launching a terminal; its header shows the current account. Switching accounts there restarts the terminal with a new session, so save or hand off current work first.
Model profiles
- Open model settings and create a profile with a name, model identifier, endpoint and API key. Use the actual values provided by your supplier; documentation examples are not credentials.
- Check that the protocol matches the selected Agent. A compatible Claude Code backend must support the relevant Anthropic API. An arbitrary model URL is not necessarily usable.
- Save the profile, select it when starting or resuming a terminal, and send a short test request. Before switching an existing terminal, read the app's notice and make sure the current task can be interrupted.
API keys are stored in Windows Credential Manager. The allowance panel shows reported quota for supported profiles, with Antigravity queried directly through its HTTP Quota endpoint. Grok Build's usage card recognizes an exhausted free allowance; an unavailable percentage is shown as unavailable, not as 0% used. Values marked as estimates or unavailable are not official billing data.
Antigravity's models and status feed
Antigravity does not use Termexo's model profiles. Its model and reasoning effort are chosen in the new-terminal dialog, from what the agy on this machine offers.
It also has no per-launch configuration of any kind, so for a terminal to know whether it is thinking, running a tool or waiting for an answer, Termexo writes into the status line in agy's own settings. This is on by default and can be turned off in Settings, which puts back whatever status line you had. Termexo only recognises the block it wrote itself and never touches one of your own.
Proxies and npm networking
If you need a proxy, create a global or workspace network profile. Enter the real proxy and npm registry settings, test connectivity, then start terminals or install CLIs. Workspace settings take precedence over global settings. Restart affected terminals after changing the profile so they receive the new environment.
05 / Tasks, Git and handoffs
Assign a task to an Agent
- Open the task board and create a task with a clear goal, project folder, priority and acceptance criteria. For example: "Add a search box; an empty query shows all items; tests pass."
- Select an Agent and model, then start execution. The task is linked to a real terminal and the app returns to the terminal view, where you can check startup and handle approvals.
- Track the task through stages such as To do, Executing, Completed and Verified. When the Agent finishes, check its output against your criteria. Give follow-up feedback if needed; verify the task only after it passes your review.
Review Git changes
Select the relevant terminal and open the Git view to inspect branches, commits and file diffs, in a single-column or side-by-side layout. The Git view follows the active terminal's working folder and uses the HEAD recorded when that terminal started as the session baseline.
In a file with many edits, the arrows in the toolbar step through the changes (Alt+Up and Alt+Down), one run of changed lines at a time rather than line by line. Where a jump lands is marked, and the lines leading into the change stay in view.
Session changes are repository differences observed during that period, not an exclusive record of this Agent's actions. Edits from an editor, other terminals or other Agents may also appear. Review each change before committing.
Reuse prompts and hand off context
- Prompt assets let you save, search, favorite and reuse submitted prompts. Drafts are restored per terminal. Check paths, accounts and task context before reusing a prompt.
- Create a terminal- or workspace-scoped handoff that gathers tasks, prompts, terminal output and Git information within a chosen token budget.
- Preview the package and check its goal, completed work, validation results, risks and next steps. Then export Markdown/JSON or pass it to another Agent to continue.
Automatic redaction cannot guarantee removal of every secret. Before sharing, manually check for API keys, access tokens, internal addresses, customer data and source-code access restrictions. A handoff is a context document, not a lossless conversion of a native session file.
06 / AI control (MCP)
Let one AI operate another and spend less time carrying messages. MCP connects AI to Termexo. A connected Agent can find another terminal, send a prompt, submit Enter and read the reply. This works with Claude Code, Codex, OpenCode, Pi Agent, Grok Build and Antigravity CLI. Use everyday language; no code or tool names to memorize.
First time? Follow these 3 steps
Add a project workspace, install and sign in to the Agent CLIs you want to use, and confirm they start normally. MCP does not replace their accounts, models or allowances. Keep Termexo running.
- Enable: In desktop Settings → AI control (MCP), enable the local server, keep automatic connection checked and allow terminal access. Check task access if you need the task board. Click Apply and look for Running. Usually, leave the port unchanged.
- Restart the Agent: Open or restart an AI terminal in Termexo so it loads the connection settings. All 6 Agents support automatic connection; a Claude attach session needs its original process restarted.
- Ask: Paste the example below into that AI terminal and press Enter. AI chooses the tools for you. Do not paste it into a plain PowerShell or CMD shell.
Use Termexo MCP to list my workspaces and terminals, and tell me which are running. Do not change anything yet.
Connected: AI calls Termexo tools and returns your actual workspaces and terminals. Saying “I can do that” alone does not verify a connection; Running only means the server is ready. Automatic connection needs no address, token or configuration file entered by hand.
Your first Agent-to-Agent action: send hi
Open an OpenCode terminal in Termexo and wait until it can accept a message. Send this to Codex, Claude Code or another Agent already connected to MCP:
Use Termexo MCP to find the running OpenCode terminal in my current workspace, send hi and submit Enter, then read its reply. If several terminals match, list their names so I can choose.
Replace OpenCode with another Agent name to operate its existing terminal. Text reaching the input box only means delivery. Submit Enter and read the actual output; “sent” or “started” does not mean “completed”.
More requests to try
- Terminals: “Open a shell terminal in the current workspace, run git status and tell me the result.” Terminal access allows AI to open or close terminals, send commands and read output.
- Tasks: “Create a Claude Code task called ‘Review project structure’. Save it without starting it.” Requires task access; you can also ask AI to start, stop or resume tasks.
- Settings: “Set the Termexo terminal font size to 18.” Enable settings access separately to change language, font size and existing model/network profiles.
Terminal and task access allow execution by default. The task board runs Claude Code, Codex, OpenCode, Pi Agent and Grok Build. Antigravity accepts messages through an existing terminal but is not a task executor. Creating a plain terminal opens a Shell, not a configured Agent. Name the target if several match, and configure the account and model before requesting a particular model.
Not working? Check these first
- AI cannot find tools: Check Running and automatic connection, then restart the AI session from Termexo.
- Permission denied: Enable the relevant permission, click Apply and reconnect AI to refresh its tools. Respond to tool approval prompts in that AI client too.
- Login expired: In Claude Code, enter
/login, follow the sign-in prompts and resend your message. This concerns the AI account. - No result or timeout: Ask AI to read the terminal output or task state before retrying. If a prompt remains in the input box, submit it with Enter.
Advanced: connect AI apps outside Termexo
Manual setup is only needed for an AI app launched outside Termexo on this PC. It must support Streamable HTTP MCP. Browser-based cloud AI cannot directly reach this local address.
- Check Running, then expand Advanced in the settings panel. The default address is
http://127.0.0.1:7421/mcp. If the port is in use, change it and click Apply. - Find the target app's MCP settings. Use Copy JSON configuration for apps accepting
mcpServersJSON, or Copy TOML configuration for Codexconfig.toml. Merge the Termexo entry, retaining other servers. Do not paste it into chat. - Reconnect or restart that AI app, then send the example above. Copied configuration includes your access token; keep it private. After changing the port or regenerating the token, copy again and update manual configuration.
AI control (MCP) lets AI operate Termexo; MCP profiles connect AI to other external tools. They are separate. Automatic connection for Grok and Antigravity adds a user-level entry; disabling automatic connection or the server and applying removes Termexo-owned entries.
Local MCP is available only on this PC; remote workbench access does not expose it. See the MCP user guide for the full tool list and technical reference.
07 / Mobile and remote access
Remote access is off by default. When enabled, a phone, tablet or another computer can operate the desktop's existing workspaces and terminals in a browser. You do not need to install the Agents on your phone.
Across networks: connect through your own relay
The desktop opens an outbound tunnel, so it needs no public IP or router port forwarding. Keep the PC on with Termexo running and connected. Terminal processes still run on the desktop.
- Follow the termexo-relay documentation to deploy an HTTPS relay reachable by both devices, or obtain an entry point from its administrator. The relay supports Linux, macOS and Windows x64 / arm64 binaries and containers.
- Enable Remote Access in desktop Settings, enter the relay address, and enroll with an enrollment code or relay account.
- For a self-signed relay certificate, verify its SHA-256 fingerprint with the administrator before entering it in the fingerprint field. Do not accept an unknown fingerprint.
- Once connected, copy the relay access link or scan its QR code. Open the HTTPS entry point on your phone and complete the required relay login and desktop access-token check; these are independent. Cascaded relays list available addresses and forwarding routes.
After the v2 handshake, session frames use AES-256-GCM; the relay forwards encrypted terminal sessions. The browser refuses to send the access token through an HTTP relay entry point. If connection fails, check the relay URL, HTTPS certificate, enrollment status and network reachability.
LAN / VPN: connect directly to the desktop
- Open Remote Access in Settings and turn on the main switch. Follow the UI to configure and save the listening address and port. The default port is
7420. - For devices on your LAN, choose a reachable LAN listening address or listen on all interfaces. Listening only on
127.0.0.1limits access to the host itself. Keep HTTPS enabled. - Confirm that the service is running. Select a reachable computer address in the address picker, then copy the generated link or display its QR code for your own device to scan.
- Connect your phone to the same LAN or a VPN that can reach the computer. Open the link in a browser and use the access token as prompted. Any working folder you enter refers to a path on the computer running the desktop app.
HTTPS uses a self-signed certificate by default, so the browser may warn that it is not trusted on first access. Confirm that this is your own computer, the correct address and a trusted network before handling the warning according to your browser's rules. Do not ignore certificate warnings on unrelated websites.
If you cannot connect, check in this order
- Is the desktop app still running? Is the computer asleep? Does the remote service show an error?
- Does the link use the actual LAN IP?
0.0.0.0is a listening setting, not the address to open on a phone. On a phone,localhostrefers to the phone itself. - Can the devices reach each other? Guest Wi-Fi may isolate clients. Check that Windows Firewall permits the selected port on the trusted network; do not disable the entire firewall.
- Has the port, IP address or token changed? Does the URL's protocol match the HTTPS setting?
Limits and disconnecting
The terminal size follows the client currently in use. A narrow phone view shows one terminal, and other clients may need to pan horizontally. Input from both devices affects the same process; avoid typing from both at once.
The remote page does not expose all desktop file import/export or app self-update features. When finished, turn off remote access in desktop Settings. Rotating the access token invalidates the old token and disconnects existing clients.
The token and QR code are remote-control credentials. Anyone holding them may operate terminals and affect files on the host. Never post them in public chats, Issues or screenshots. Use a managed HTTPS relay across networks; keep direct desktop access on a trusted LAN or controlled VPN without exposing its listening port to the internet.
08 / Frequently asked questions
An Agent is not detected, or its command will not start.
Check its installation status in Settings, then confirm that the CLI can start in a system terminal. Run detection again after installation. Check PATH, Node/npm, the working folder and network settings. If npm cannot install it, try the vendor's own script instead, bearing in mind that the two install separate executables and PATH decides which one runs when both are present. Antigravity's command-line tool is not on PATH, and Termexo looks for it where its installer puts it. For sign-in failures, confirm that the selected isolated account has completed authorization.
History is missing, or resuming reports an invalid session.
Check that you are using the original account and project folder, that native session files still exist, and that the CLI can read them. Changing accounts, deleting CLI data or moving a project can affect recovery. Do not manually edit native session IDs. If necessary, start a new session and continue with a reviewed handoff package.
A model request fails with an authentication or API error.
Check the selected profile, model name, API key, and endpoint protocol and path. Confirm that the provider supports the interfaces required by the CLI. Then check balance and proxy settings. Keep error codes for troubleshooting, but do not publish full request headers or secrets.
I can see the terminal on my phone, but cannot copy or paste.
Browser clipboard access depends on a secure context and permissions. Use HTTPS and grant permission when prompted. If it remains unavailable, select text to copy or paste manually. Drag with a finger to scroll the terminal on a narrow screen.
How do I update Termexo?
Installer users can download from the latest release page. npm users can run npx termexo@latest or update the global installation. Save files and finish or hand off running tasks before updating. Updating Termexo and updating an Agent CLI are separate operations; upgrade CLIs in their own management entry.
09 / Data and security
- Termexo works locally by default, with no Termexo account or mandatory cloud sync. Workspace state stays on the host, and API keys are stored in Windows Credential Manager.
- The Storage panel in Settings names the data directory, lists what is in it with the size of each file, and gives the running executable's own path and version. The database is the thing worth watching.
- The data directory can be moved to another drive: choose an empty directory and Termexo copies everything there and records it for the next start. Nothing is deleted by the move: the panel names the previous copy, which you reclaim yourself once you are satisfied. The target directory must be empty.
- Agent CLIs still send requests to the model services you choose. Which code and context leave the computer depends on the CLI, provider configuration and privacy policy.
- The public website has separate third-party visit statistics. These do not track desktop or remote-workbench sessions and are not download counts.
Report problems through GitHub Issues. Include your Termexo, Windows and CLI versions, reproduction steps, expected and actual behavior, and redacted error details. Hide accounts, keys, tokens, QR codes and sensitive paths before submitting.
Latest online guide: https://www.termexo.com/guide.en.html
Release history: GitHub Releases